# 从零开始带你写一个运行命令行的终端[手把手教学]
# 前言
Electron很出名,很多人可能了解过,知道它是用来开发桌面端的应用,但是一直没有在项目中实践过,缺乏练手的实践项目。
很多开源的命令行终端都是使用Electron来开发的,本文将从零开始手把手的教大家用Electron写一个命令行终端。
作为一个完整的实战项目示例,该终端demo也将集成到Electron开源学习项目electron-playground中,目前这个项目拥有700+ Star⭐️,它最大的特点是所见即所得的演示Electron的各种特性,帮助大家快速学习、上手Electron。
大家跟着本文一起来试试Electron吧~
# 终端效果
开源地址: electron-terminal-demo
giit提交代码演示
# 目录
初始化项目。
项目目录结构
Electron启动入口index-创建窗口
进程通信类-processMessage。
窗口html页面-命令行面板
命令行面板做了哪些事情
- 核心方法:child_process.spawn-执行命令行监听命令行的输出
- stderr不能直接识别为命令行执行错误
- 命令行终端执行命令保存输出信息的核心代码
- html完整代码
- 命令行终端的更多细节
下载试玩
- 项目演示
- 项目地址
- 启动与调试
小结
# 初始化项目
npm init
npm install electron -D
2
如果Electron安装不上去,需要添加一个.npmrc文件,来修改Electron的安装地址,文件内容如下:
registry=https://registry.npm.taobao.org/
electron_mirror=https://npm.taobao.org/mirrors/electron/
chromedriver_cdnurl=https://npm.taobao.org/mirrors/chromedriver
2
3
修改一下package.json的入口main和scripts选项, 现在package.json长这样,很简洁:
{
  "name": "electron-terminal",
  "version": "1.0.0",
  "main": "./src/index.js",
  "scripts": {
    "start": "electron ."
  },
  "devDependencies": {
    "electron": "^11.1.1"
  }
}
2
3
4
5
6
7
8
9
10
11
# 项目目录结构
我们最终实现的项目将是下面这样子的,页面css文件不算的话,我们只需要实现src下面的三个文件即可。
.
├── .vscode // 使用vscode的调试功能启动项目
├── node_dodules
├── src
│   ├── index.js // Electron启动入口-创建窗口
│   └── processMessage.js // 主进程和渲染进程通信类-进程通信、监听时间
│   └── index.html // 窗口html页面-命令行面板、执行命令并监听输出
│   └── index.css // 窗口html的css样式 这部分不写
├── package.json
└── .npmrc // 修改npm安装包的地址
└── .gitignore
2
3
4
5
6
7
8
9
10
11
# Electron启动入口index-创建窗口
- 创建窗口, 赋予窗口直接使用node的能力。
- 窗口加载本地html页面
- 加载主线程和渲染进程通信逻辑
// ./src/index.js
const { app, BrowserWindow } = require('electron')
const processMessage = require('./processMessage')

// 创建窗口
function createWindow() {
  // 创建窗口
  const win = new BrowserWindow({
    width: 800,
    height: 600,
    webPreferences: {
      nodeIntegration: true, // 页面直接使用node的能力 用于引入node模块 执行命令
    },
  })
  // 加载本地页面
  win.loadFile('./src/index.html')
  win.webContents.openDevTools() // 打开控制台
  // 主线程和渲染进程通信
  const ProcessMessage = new processMessage(win)
  ProcessMessage.init()
}

// app ready 创建窗口
app.whenReady().then(createWindow)
2
3
4
5
6
7
8
9
10
11
12
13
14
15
16
17
18
19
20
21
22
23
24
# 进程通信类-processMessage
electron分为主进程和渲染进程,因为进程不同,在各种事件发生的对应时机需要相互通知来执行一些功能。
这个类就是用于它们之间的通信的,electron通信这部分封装的很简洁了,照着用就可以了。
// ./src/processMessage.js
const { ipcMain } = require('electron')
class ProcessMessage {
  /**
   * 进程通信
   * @param {*} win 创建的窗口
   */
  constructor(win) {
    this.win = win
  }
  init() {
    this.watch()
    this.on()
  }
  // 监听渲染进程事件通信
  watch() {
    // 页面准备好了
    ipcMain.on('page-ready', () => {
      this.sendFocus()
    })
  }
  // 监听窗口、app、等模块的事件
  on() {
    // 监听窗口是否聚焦
    this.win.on('focus', () => {
      this.sendFocus(true)
    })
    this.win.on('blur', () => {
      this.sendFocus(false)
    })
  }
  /**
   * 窗口聚焦事件发送
   * @param {*} isActive 是否聚焦
   */
  sendFocus(isActive) {
    // 主线程发送事件给窗口
    this.win.webContents.send('win-focus', isActive)
  }
}
module.exports = ProcessMessage
2
3
4
5
6
7
8
9
10
11
12
13
14
15
16
17
18
19
20
21
22
23
24
25
26
27
28
29
30
31
32
33
34
35
36
37
38
39
40
41
# 窗口html页面-命令行面板
在创建窗口的时候,我们赋予了窗口使用node的能力, 可以在html中直接使用node模块。
所以我们不需要通过进程通信的方式来执行命令和渲染输出,可以直接在一个文件里面完成。
终端的核心在于执行命令,渲染命令行输出,保存命令行的输出。
这些都在这个文件里面实现了,代码行数不到250行。
# 命令行面板做了哪些事情
页面: 引入vue、element,css文件来处理页面
template模板-渲染当前命令行执行的输出以及历史命令行的执行输出
核心:执行命令监听命令行输出
- 执行命令并监听执行命令的输出,同步渲染输出。
- 执行完毕,保存命令行输出的信息。
- 渲染历史命令行输出。
- 对一些命令进行特殊处理,比如下面的细节处理。
围绕执行命令行的细节处理
- 识别cd,根据系统保存cd路径
- 识别clear清空所有输出。
- 执行成功与失败的箭头图标展示。
- 聚焦窗口,聚焦输入。
- 命令执行完毕滚动底部。
- 等等细节。
# 核心方法:child_process.spawn-执行命令行监听命令行的输出
# child_process.spawn介绍
spawn是node子进程模块child_process提供的一个异步方法。
它的作用是执行命令并且可以实时监听命令行执行的输出。
当我第一次知道这个API的时候,我就感觉这个方法简直是为命令行终端量身定做的。
终端的核心也是执行命令行,并且实时输出命令行执行期间的信息。
下面就来看看它的使用方式。
# 使用方式
const { spawn } = require('child_process');
const ls = spawn('ls', {
  encoding: 'utf8',
  cwd: process.cwd(), // 执行命令路径
  shell: true, // 使用shell命令
})

// 监听标准输出
ls.stdout.on('data', (data) => {
  console.log(`stdout: ${data}`);
});

// 监听标准错误
ls.stderr.on('data', (data) => {
  console.error(`stderr: ${data}`);
});

// 子进程关闭事件
ls.on('close', (code) => {
  console.log(`子进程退出,退出码 ${code}`);
});
2
3
4
5
6
7
8
9
10
11
12
13
14
15
16
17
18
19
20
21
api的使用很简单,但是终端信息的输出,需要很多细节的处理,比如下面这个。
# stderr不能直接识别为命令行执行错误
stderr虽然是标准错误输出,但里面的信息不全是错误的信息,不同的工具会有不同的处理。
对于git来说,有很多命令行操作的输出信息都输出在stederr上。
比如git clone、git push等,信息输出在stederr中,我们不能将其视为错误。
git总是将详细的状态信息和进度报告,以及只读信息,发送给stederr。
具体细节可以查看git stderr(错误流)探秘等资料。
暂时还不清楚其他工具/命令行也有没有类似的操作,但是很明显我们不能将stederr的信息视为错误的信息。
PS: 对于git如果想提供更好的支持,需要根据不同的git命令进行特殊处理,比如对下面clear命令和cd命令的特殊处理。
根据子进程close事件判断命令行是否执行成功
我们应该检测close事件的退出码code, 如果code为0则表示命令行执行成功,否则即为失败。
# 命令行终端执行命令保存输出信息的核心代码
下面这段是命令行面板的核心代码,我贴一下大家重点看一下,
其他部分都是一些细节、优化体验、状态处理这样的代码,下面会将完整的html贴上来。
const { spawn } = require('child_process') // 使用node child_process模块
// 执行命令行
actionCommand() {
  // 处理command命令
  const command = this.command.trim()
  this.isClear(command)
  if (this.command === '') return
  // 执行命令行
  this.action = true
  this.handleCommand = this.cdCommand(command)
  const ls = spawn(this.handleCommand, {
    encoding: 'utf8',
    cwd: this.path, // 执行命令路径
    shell: true, // 使用shell命令
  })
  // 监听命令行执行过程的输出
  ls.stdout.on('data', (data) => {
    const value = data.toString().trim()
    this.commandMsg.push(value)
    console.log(`stdout: ${value}`)
  })

  ls.stderr.on('data', this.stderrMsgHandle)
  ls.on('close', this.closeCommandAction)
},
// 错误或详细状态进度报告 比如 git push
stderrMsgHandle(data) {
  console.log(`stderr: ${data}`)
  this.commandMsg.push(`stderr: ${data}`)
},
// 执行完毕 保存信息 更新状态
closeCommandAction(code) {
  // 保存执行信息
  this.commandArr.push({
    code, // 是否执行成功
    path: this.path, // 执行路径
    command: this.command, // 执行命令
    commandMsg: this.commandMsg.join('\r'), // 执行信息
  })
  // 清空
  this.updatePath(this.handleCommand, code)
  this.commandFinish()
  console.log(
    `子进程退出,退出码 ${code}, 运行${code === 0 ? '成功' : '失败'}`
  )
}
2
3
4
5
6
7
8
9
10
11
12
13
14
15
16
17
18
19
20
21
22
23
24
25
26
27
28
29
30
31
32
33
34
35
36
37
38
39
40
41
42
43
44
45
46
# html完整代码
这里是html的完整代码,代码中有详细注释,建议根据上面的命令行面板做了哪些事情,来阅读源码。
<!DOCTYPE html>
<html>
  <head>
    <meta charset="UTF-8" />
    <meta name="viewport" content="width=device-width, initial-scale=1.0" />
    <title>极简electron终端</title>
    <link
      rel="stylesheet"
      href="https://unpkg.com/element-ui/lib/theme-chalk/index.css"
    />
    <script src="https://unpkg.com/vue"></script>
    <!-- 引入element -->
    <script src="https://unpkg.com/element-ui/lib/index.js"></script>
    <!-- css -->
    <link rel="stylesheet" href="./index.css" />
  </head>
  <body>
    <div id="app">
      <div class="main-class">
        <!-- 渲染过往的命令行 -->
        <div v-for="item in commandArr">
          <div class="command-action">
            <!-- 执行成功或者失败图标切换 -->
            <i
              :class="['el-icon-right', 'command-action-icon', { 'error-icon': item.code !== 0  }]"
            ></i>
            <!-- 过往执行地址和命令行、信息 -->
            <span class="command-action-path">{{ item.path }} $</span>
            <span class="command-action-contenteditable"
              >{{ item.command }}</span
            >
          </div>
          <div class="output-command">{{ item.commandMsg }}</div>
        </div>
        <!-- 当前输入的命令行 -->
        <div
          class="command-action command-action-editor"
          @mouseup="timeoutFocusInput"
        >
          <i class="el-icon-right command-action-icon"></i>
          <!-- 执行地址 -->
          <span class="command-action-path">{{ path }} $</span>
          <!-- 命令行输入 -->
          <span
            :contenteditable="action ? false : 'plaintext-only'"
            class="command-action-contenteditable"
            @input="onDivInput($event)"
            @keydown="keyFn"
          ></span>
        </div>
        <!-- 当前命令行输出 -->
        <div class="output-command">
          <div v-for="item in commandMsg">{{item}}</div>
        </div>
      </div>
    </div>

    <script>
      const { ipcRenderer } = require('electron')
      const { spawn } = require('child_process')
      const path = require('path')

      var app = new Vue({
        el: '#app',
        data: {
          path: '', // 命令行目录
          command: '', // 用户输入命令
          handleCommand: '', // 经过处理的用户命令 比如清除首尾空格、添加获取路径的命令
          commandMsg: [], // 当前命令信息
          commandArr: [], // 过往命令行输出保存
          isActive: true, // 终端是否聚焦
          action: false, // 是否正在执行命令
          inputDom: null, // 输入框dom
          addPath: '', // 不同系统 获取路径的命令 mac是pwd window是chdir
        },
        mounted() {
          this.addGetPath()
          this.inputDom = document.querySelector(
            '.command-action-contenteditable'
          )
          this.path = process.cwd() // 初始化路径
          this.watchFocus()
          ipcRenderer.send('page-ready') // 告诉主进程页面准备好了
        },
        methods: {
          // 回车执行命令
          keyFn(e) {
            if (e.keyCode == 13) {
              this.actionCommand()
              e.preventDefault()
            }
          },
          // 执行命令
          actionCommand() {
            const command = this.command.trim()
            this.isClear(command)
            if (this.command === '') return
            this.action = true
            this.handleCommand = this.cdCommand(command)
            const ls = spawn(this.handleCommand, {
              encoding: 'utf8',
              cwd: this.path, // 执行命令路径
              shell: true, // 使用shell命令
            })
            // 监听命令行执行过程的输出
            ls.stdout.on('data', (data) => {
              const value = data.toString().trim()
              this.commandMsg.push(value)
              console.log(`stdout: ${value}`)
            })
            // 错误或详细状态进度报告 比如 git push、 git clone
            ls.stderr.on('data', (data) => {
              const value = data.toString().trim()
              this.commandMsg.push(`stderr: ${data}`)
              console.log(`stderr: ${data}`)
            })
            // 子进程关闭事件 保存信息 更新状态
            ls.on('close', this.closeCommandAction)
          },
          // 执行完毕 保存信息 更新状态
          closeCommandAction(code) {
            // 保存执行信息
            this.commandArr.push({
              code, // 是否执行成功
              path: this.path, // 执行路径
              command: this.command, // 执行命令
              commandMsg: this.commandMsg.join('\r'), // 执行信息
            })
            // 清空
            this.updatePath(this.handleCommand, code)
            this.commandFinish()
            console.log(
              `子进程退出,退出码 ${code}, 运行${code === 0 ? '成功' : '失败'}`
            )
          },
          // cd命令处理
          cdCommand(command) {
            let pathCommand = ''
            if (this.command.startsWith('cd ')) {
              pathCommand = this.addPath
            } else if (this.command.indexOf(' cd ') !== -1) {
              pathCommand = this.addPath
            }
            return command + pathCommand
            // 目录自动联想...等很多细节功能 可以做但没必要2
          },
          // 清空历史
          isClear(command) {
            if (command === 'clear') {
              this.commandArr = []
              this.commandFinish()
            }
          },
          // 获取不同系统下的路径
          addGetPath() {
            const systemName = getOsInfo()
            if (systemName === 'Mac') {
              this.addPath = ' && pwd'
            } else if (systemName === 'Windows') {
              this.addPath = ' && chdir'
            }
          },
          // 命令执行完毕 重置参数
          commandFinish() {
            this.commandMsg = []
            this.command = ''
            this.inputDom.textContent = ''
            this.action = false
            // 激活编辑器
            this.$nextTick(() => {
              this.focusInput()
              this.scrollBottom()
            })
          },
          // 判断命令是否添加过addPath
          updatePath(command, code) {
            if (code !== 0) return
            const isPathChange = command.indexOf(this.addPath) !== -1
            if (isPathChange) {
              this.path = this.commandMsg[this.commandMsg.length - 1]
            }
          },
          // 保存输入的命令行
          onDivInput(e) {
            this.command = e.target.textContent
          },
          // 点击div
          timeoutFocusInput() {
            setTimeout(() => {
              this.focusInput()
            }, 200)
          },
          // 聚焦输入
          focusInput() {
            this.inputDom.focus() //解决ff不获取焦点无法定位问题
            var range = window.getSelection() //创建range
            range.selectAllChildren(this.inputDom) //range 选择obj下所有子内容
            range.collapseToEnd() //光标移至最后
            this.inputDom.focus()
          },
          // 滚动到底部
          scrollBottom() {
            let dom = document.querySelector('#app')
            dom.scrollTop = dom.scrollHeight // 滚动高度
            dom = null
          },
          // 监听窗口聚焦、失焦
          watchFocus() {
            ipcRenderer.on('win-focus', (event, message) => {
              this.isActive = message
              if (message) {
                this.focusInput()
              }
            })
          },
        },
      })

      // 获取操作系统信息
      function getOsInfo() {
        var userAgent = navigator.userAgent.toLowerCase()
        var name = 'Unknown'
        if (userAgent.indexOf('win') > -1) {
          name = 'Windows'
        } else if (userAgent.indexOf('iphone') > -1) {
          name = 'iPhone'
        } else if (userAgent.indexOf('mac') > -1) {
          name = 'Mac'
        } else if (
          userAgent.indexOf('x11') > -1 ||
          userAgent.indexOf('unix') > -1 ||
          userAgent.indexOf('sunname') > -1 ||
          userAgent.indexOf('bsd') > -1
        ) {
          name = 'Unix'
        } else if (userAgent.indexOf('linux') > -1) {
          if (userAgent.indexOf('android') > -1) {
            name = 'Android'
          } else {
            name = 'Linux'
          }
        }
        return name
      }
    </script>
  </body>
</html>
2
3
4
5
6
7
8
9
10
11
12
13
14
15
16
17
18
19
20
21
22
23
24
25
26
27
28
29
30
31
32
33
34
35
36
37
38
39
40
41
42
43
44
45
46
47
48
49
50
51
52
53
54
55
56
57
58
59
60
61
62
63
64
65
66
67
68
69
70
71
72
73
74
75
76
77
78
79
80
81
82
83
84
85
86
87
88
89
90
91
92
93
94
95
96
97
98
99
100
101
102
103
104
105
106
107
108
109
110
111
112
113
114
115
116
117
118
119
120
121
122
123
124
125
126
127
128
129
130
131
132
133
134
135
136
137
138
139
140
141
142
143
144
145
146
147
148
149
150
151
152
153
154
155
156
157
158
159
160
161
162
163
164
165
166
167
168
169
170
171
172
173
174
175
176
177
178
179
180
181
182
183
184
185
186
187
188
189
190
191
192
193
194
195
196
197
198
199
200
201
202
203
204
205
206
207
208
209
210
211
212
213
214
215
216
217
218
219
220
221
222
223
224
225
226
227
228
229
230
231
232
233
234
235
236
237
238
239
240
241
242
243
244
245
246
247
以上就是整个项目的代码实现,总共只有三个文件。
更多细节
本项目终究是一个简单的demo,如果想要做成一个完整的开源项目,还需要补充很多细节。
还会有各种各样奇奇怪怪的需求和需要定制的地方,比如下面这些:
command+c终止命令cd目录自动补全- 命令保存上下键滑动
- git等常用功能单独特殊处理。
- 输出信息颜色变化
- 等等
# 下载试玩
即使这个终端demo的代码量很少,注释足够详细,但还是需要上手体验一下一个Electron项目运行的细节。
# 项目演示
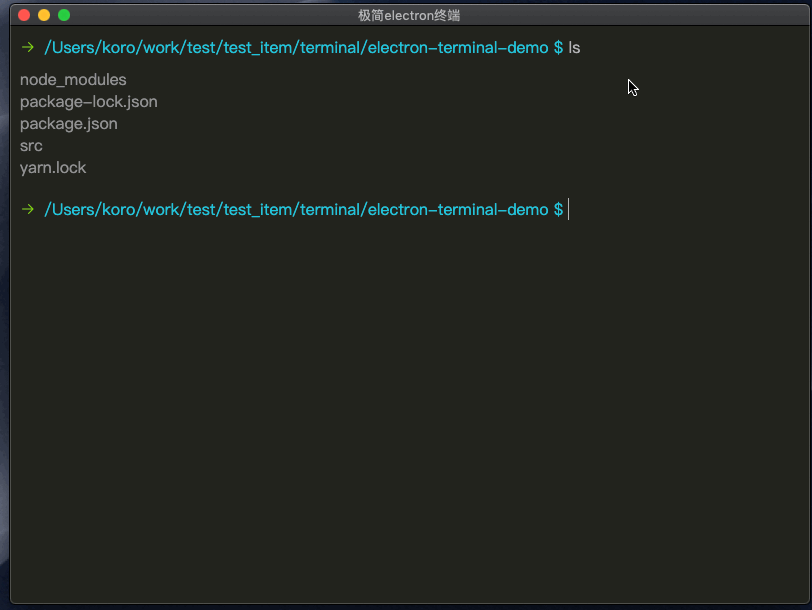
clear命令演示
实际上就是将历史命令行输出的数组重置为空数组。
![]()
执行失败箭头切换
根据子进程close事件,判断执行是否成功,切换一下图标。
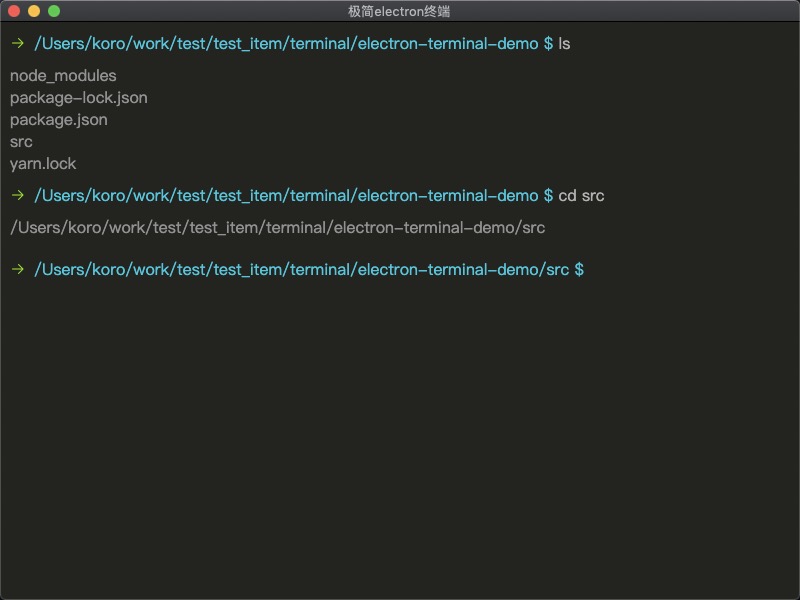
cd命令
识别cd命令,根据系统添加获取路径(pwd/chdir)的命令,再将获取到的路径,更改为最终路径。
giit提交代码演示
# 项目地址
开源地址: electron-terminal-demo
# 启动与调试
安装
npm install
启动
通过vscode的调试运行项目,这种形式可以直接在VSCode中进行debugger调试。
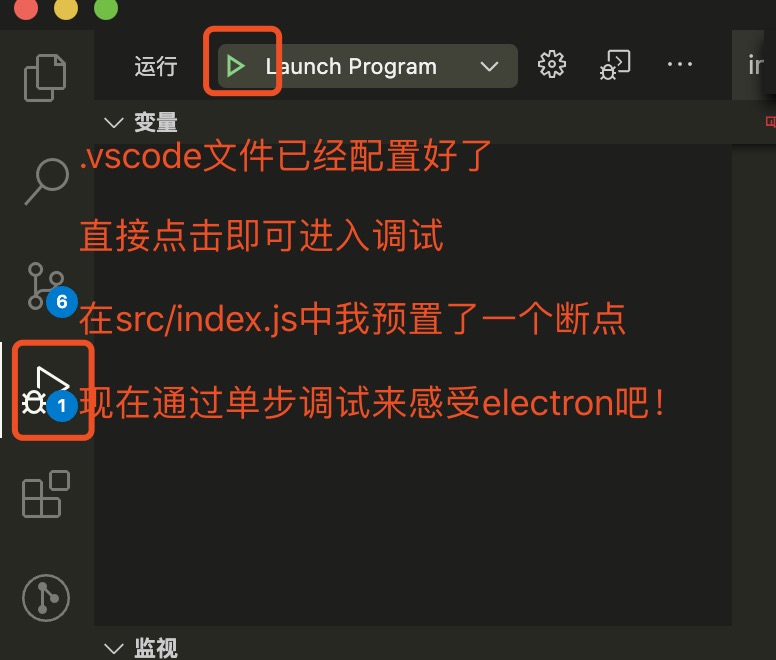
如果不是使用vscode编辑器, 也可以通过使用命令行启动。
npm run start
# 小结
命令行终端的实现原理就是这样啦,强烈推荐各位下载体验一下这个项目,最好单步调试一下,这样会更熟悉Electron。
文章idea诞生于我们团队开源的另一个开源项目:electron-playground, 目的是为了让小伙伴学习electron实战项目。
electron-playground是用来帮助前端小伙伴们更好、更快的学习和理解前端桌面端技术Electron, 尽量少走弯路。
它通过如下方式让我们快速学习electron。
- 带有gif示例和可操作的demo的教程文章。
- 系统性的整理了Electron相关的api和功能。
- 搭配演练场,自己动手尝试electron的各种特性。
前端进阶积累、公众号、GitHub、wx:OBkoro1、邮箱:obkoro1@foxmail.com
以上2021/01/12